


A few months ago I ran across this gorgeous dress from Land’s End. It was kind of stuck in my brain for a while, and then in a stroke of absolute luck I found a super similar lace fabric at Jo-Ann’s (of course, when I wasn’t looking to buy fabric…isn’t that always how it goes??) and knew I had to make my own.
I wore mine for Easter Sunday, since I always like to have a new dress for Easter, but it would make such a perfect dress for a summer wedding, or just for church during the warmer months.
Click through to find the tutorial!
Materials:
-
1 ½ yards lace (mine is a stretchy crocheted lace)
-
1 ½ yards lining (mine is a lightweight knit)
-
bias tape
-
20-22” invisible zipper
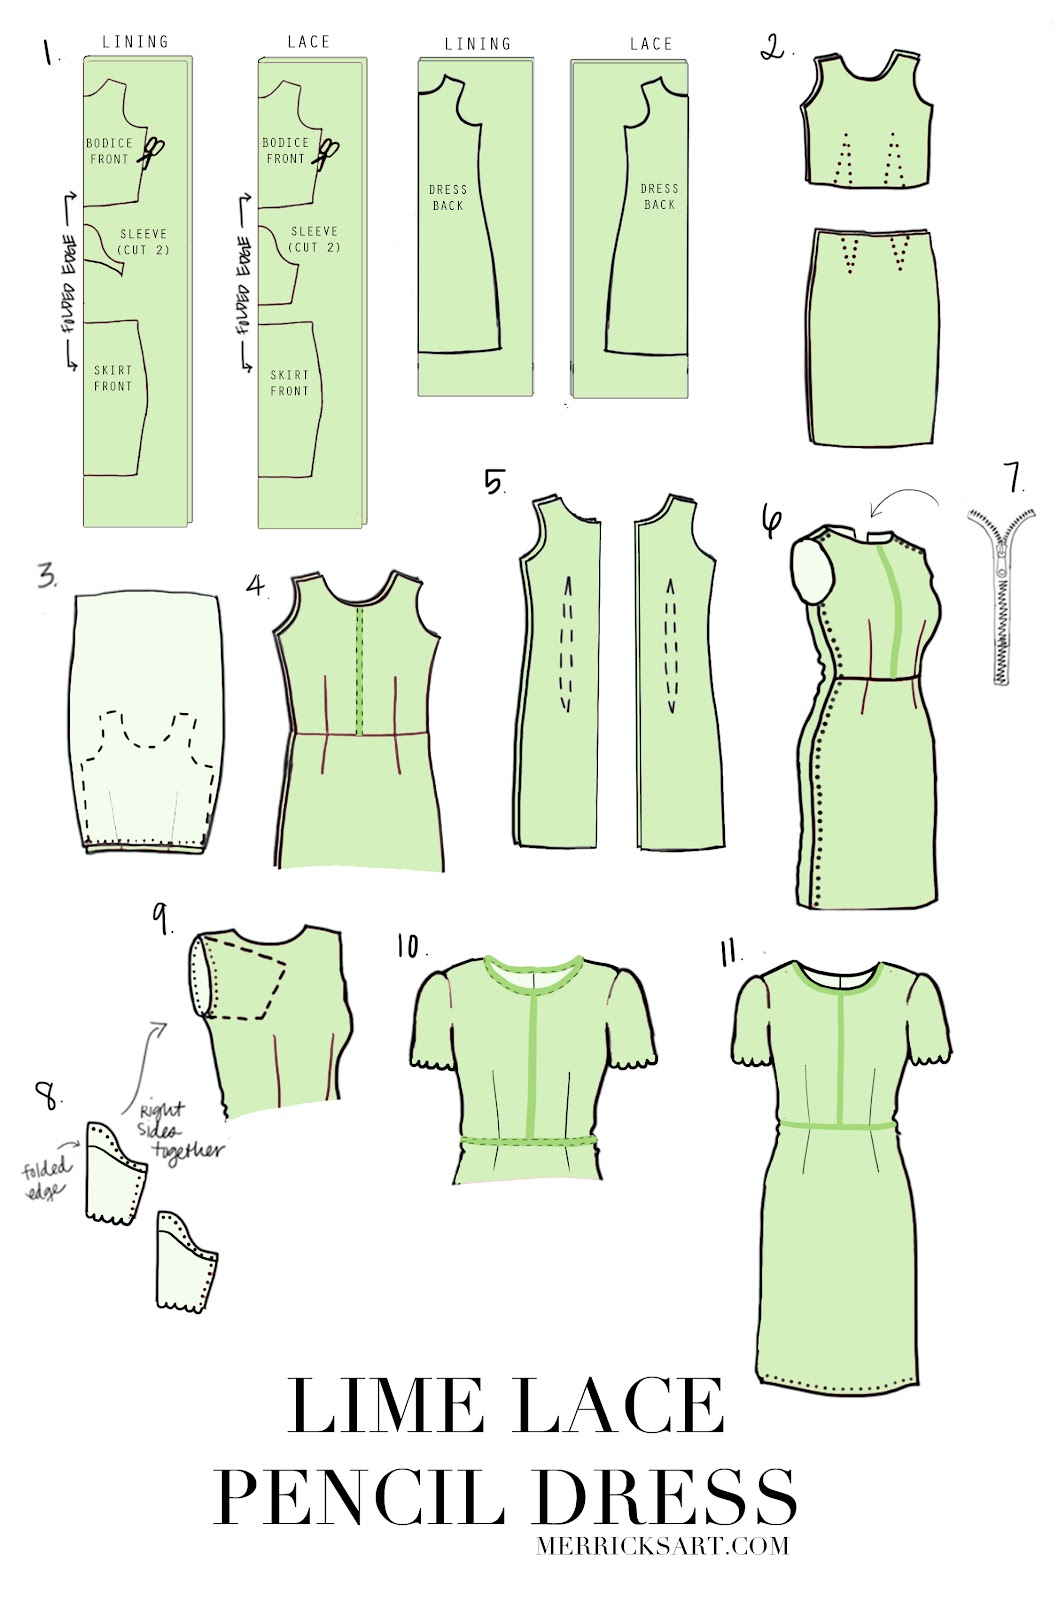
Step 1. Cut out all your pieces. Use a fitted dress or shirt and skirt as a pattern. Cut 2 BODICE FRONT pieces (in lining and lace), 2 CAP SLEEVES (out of lining), 2 FULL SLEEVES (out of lace), and 2 SKIRT FRONT pieces (out of lace and lining). These should all be cut along the folded edge. Then, cut 4 DRESS BACK pieces (in lining and lace) — these will not be cut along the folded edge.
Step 2. Take the lining and lace of your BODICE FRONT and SKIRT FRONT pieces, and add darts. This will help them mold to your curves. Just pin the lace and lining together to sew the darts in — don’t add them on the lining and lace separately.
Step 3. With right sides together, match up the waistbands of the BODICE FRONT and SKIRT FRONT and sew them together with a straight stitch.
Step 4. Once the front of your dress is sewn together, cut a piece of bias tape to fit the length from the neckline to the waist seam. Pin it down the middle of the bodice and sew down it on both sides to secure it in place.
Step 5. Now move to the DRESS BACK pieces. Take the lining and lace pieces for each and add a long tapered dart on each side.
Step 6. Place the dress front and dress back together with right sides together and sew up the shoulders and side seams.
Step 7. Insert your invisible zipper using the instructions on the package.
Step 8. Now time for the sleeves. First, hem the lining cap sleeves. Now place the lining cap sleeves on top of the regular length lace sleeve, matching up the shoulder curves. Baste in place along the shoulder curve (this is optional, but it helps the lining to stay in place). With right sides together, sew up the sleeve inseams.
Step 9. With right sides together, insert the sleeve into the armhole and pin in place. Sew around the entire arm hole, attaching the sleeve to the dress. Repeat for the other side.
Step 10. Cut a piece of bias tape to fit around your waist. Pin and sew in place, sewing along the bottom edge and top edge to secure in place. Do the same for the neckline, opening up the bias tape and enclosing it over the top of the raw edge of the neckline. Sew around the bottom edge with a straight wide stitch.
Step 11. Hem the bottom of your skirt to your desired length and you’re done!
Happy Friday!
*photos by jana laurene


I like your version better than the original! Merrick, you are extremely talented. Every time you make something, I’m… What’s the word? Flabbergasted. Absolutely flabbergasted. You’ve got a gift, that’s for sure!
I´m absolutely in love with your dress Merrick! You look stunning!
I was just wondering how you sew the lining and the lace to the zipper…? didn´t really get that point and hope you could this a little more in detail? (Or maybe make a tutorial about it?) 🙂
I didn’t sew the lining separately…I just treated the lining an lace as one fabric, which makes it a lot easier! Hope that makes sense!
That dress is so beautiful! ! I love the color!! Makes me wish I could sew!! Love your blog!! 🙂
I love this dress! It is simply wonderful & even better than the original! I would try to make it on my own, but I´m not really talented and I have no sewing machine, so it would be probably a bit difficult 😀
How about you come to MD and teach me to sew!!
What a beautiful dress. Thank you for posting the tutorial. I’ve made several things from your blog and am a big fan. You have wonderful style! Thanks.
Such a pretty and bright dress! It fits you perfectly! You look gorgeous!
http://lartoffashion.com
I love your version of the dress much better Merrick! Awesome as always at what you do…and to look adorable too, you’re one blessed girl. :o)
You are so talented girl! I love love love your version and wish I could sew so well… although you make it seem so easy ha!
Happy Medley
Wow can’t believe you made this! It’s absolutely stunning! Have a great weekend 🙂
xo, Katy
http://www.thestyleisland.com
Merrick, I truly admire your style and skill with the sewing machine, but with my sewing skills and body type, I would end up looking more like a beached whale than a chic fashionista! I have got to start learning how to sew a few basics. How fun would it be to tell people I made it myself when they ask where something is from.
This dress is absolutely amazing! I would totally just pay you to make this for me 😉
Paige
http://thehappyflammily.com
This is such a beautiful dress! I am always so impressed with you just sewing up a new dress for Easter! You’re so fabulous!!! This is a great color on you…can’t wait to see how you style it next! Happy Friday! Xo
http://www.Stylemelauren.com
Can you please start your own line of clothing? I would seriously buy every item! This dress is SO beautiful!!! I love all your work! 🙂
SO beautiful! Love the color combo.
Gorgeous and thank you for the tutorial. Your photos are always so beautifu!
http://www.StyleSewMe.com
love the bias tape detail, it really sets this dress apart! You’re talented and very hardworking!
I love this dress, and can’t wait to try it. Now to find some lace!
Cool DIY! I haven’t sewn anything in awhile, but this totally makes me want to dust off my machine! 🙂
xx, Ashleigh | Fashion in Flight
That dress is adorable! The Loft has one similar to it right now, but your’s is cuter! Plus you made it so cheaper!
You have some mad skills, Girl! Beautiful!
This is such a gorgeous look. Beautiful dress!
http://www.MARTAsFASHIONdiary.com/
Love the color of this dress! Can I just hire you to make clothes for me? 😀 haha
Unique Geek
Beautiful dress! How long does it usually take you to design and sew your dreseses?
It totally depends on the dress, how late I’m working (which makes me work more slowly), how involved or intricate the dress is, etc. Some dresses I can pump out in an hour or two, and other take me a few days.
Such a gorgeous dress! I can’t stop thinking about it. I’m having a go at making this in mint green this weekend, wish me luck!
Beautiful!!! I just got a sewing machine and can’t wait to start! Thanks for sharing!
Beautiful! You’re so talented! I agree with a commenter below…yours is definitely cuter than Loft’s!
-Celeste
http://wineandalines.blogspot.com/
Omg this is so cute! I am really upset that when I looked to see where I could find this I noticed that it wouldn’t be in stores because you made it. You are really talented!! (:
Amanda
http://www.blissfulgal.com
How do you determine how large to cut the bodice? I attempted to make a dress and once it was complete the bodice it didn’t have adequate space for the bust. Help!!!
I’m working on a few full tutorials to help with just that! Stay tuned! xx
I just looked through this page and then went to the page for what inspired it and…Oh my goodness! Can I just say that yours was way better?? Their’s was cute, but I thought yours was darling. A perfect color, loved the button shape of the lace, love the top stitch embellishment, and it fits you perfectly. (the model’s was a little baggy, so that probably contributed to hers not being quite so perfect as yours). I only just noticed your blog via pinterest, and I am in love with it. I’m not kidding when I say that you are inspiring me. I’m a novice seamstress; i’ve only made a couple of aprons, costumes, blankets, and a skirt…and I have other partially done or not yet started dresses for myself just waiting…for me to get the courage to go ahead and make a couple of mistakes, so that I can actually become more proficient. I’m not too bad as beginners go, but I just find this great fabric and then I don’t want to ruin it because I’m not great yet. It’s kinda like when you haven’t played the piano too much in front of people yet but you just have to take a swing at it anyways and later on it becomes easy. Anywho, I appreciate you sharing your projects; it shows that you don’t have to be old or cheesy to sew well, and I just need to take the jump and get started on my new projects. 😀 thank you again for being awesome at this and sharing it!! it helps people like me!
What type of knit fabric did you use? I’ve found a beautiful ivory lace I could use for this, but any lightweight knit in light colors is totally see through! I feel like an interlock knit is too heavy though? Help!
That is tough, especially because ivory is impossible to not be see through. I used a jersey knit, and it’s thin and a little see through, but I wore a slip and it was fine. However, there are thicker cotton/spandex blends out there that are thicker…keep looking, I’m sure you’ll find one! Sorry to not be more help!
I tried making this dress but I made it too small 🙁 I think I’ll try again but with a longer zipper